
How to Register Reliable Cloud Hosting for Scalable Web Apps
Modern web applications demand an infrastructure that can dynamically scale to meet fluctuating user loads while maintaining sub-200ms response times and 99.99% uptime. Traditional shared or even dedicated server hosting often struggles to deliver this elasticity without significant over-provisioning or service interruptions during traffic spikes. Registering reliable cloud hosting is not merely about provisioning a server; it's about architecting a resilient, cost-effective, and performant environment capable of handling millions of requests per second. The objective is to build a foundation that supports continuous delivery and growth, not just initial deployment.
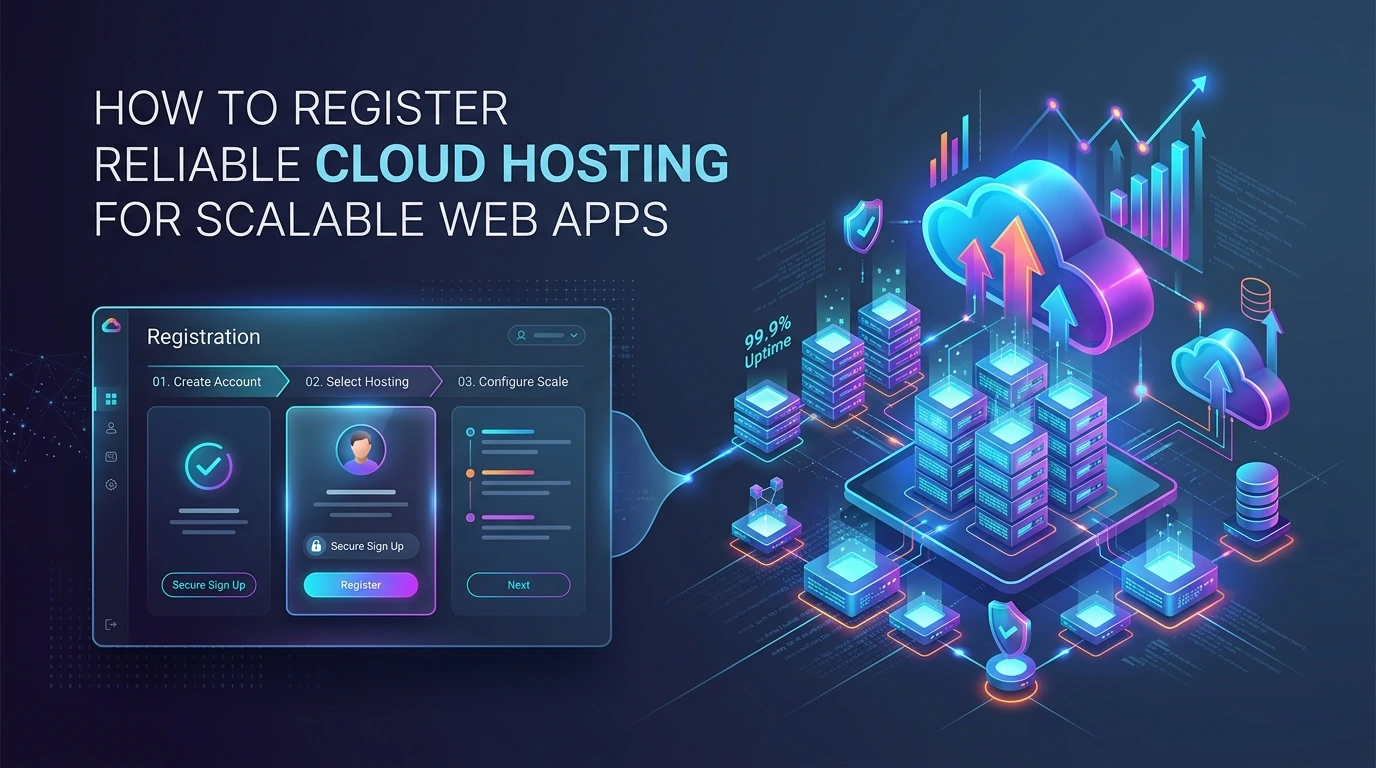
Immediate Problem Identification & Required Prerequisites/Tools Checklist
The core problem is achieving true scalability and high availability for web applications without prohibitive costs or complex on-premise infrastructure. This means handling unpredictable traffic surges, ensuring data redundancy, and minimizing latency for a global user base. Cloud hosting provides the primitives, but correct implementation is critical.
Prerequisites:
- Domain Name: A registered domain name (e.g.,
yourwebapp.com) ready for DNS configuration. - Application Codebase: Your web application's code, ideally containerized (Docker) or ready for serverless deployment.
- Basic Web Infrastructure Knowledge: Familiarity with concepts like DNS, HTTP/HTTPS, databases, and networking fundamentals (IP addresses, ports).
- Payment Method: A valid credit card or billing account for the chosen cloud provider.
- Security Best Practices: Understanding of strong passwords, multi-factor authentication (MFA), and least privilege principles.
Tools Checklist:
- Web Browser: For accessing cloud provider consoles.
- SSH Client: (e.g., PuTTY for Windows, built-in terminal for macOS/Linux) for secure shell access to virtual machines.
- Version Control System: (e.g., Git) for managing application code and facilitating deployments.
- Text Editor/IDE: For code development and configuration file editing.
- Cloud Provider CLI (Optional but Recommended): Command Line Interface tools (e.g., AWS CLI, Azure CLI, gcloud CLI) for programmatic control.
Chronological Step-by-Step Procedural Guide
Step 1: Selecting a Cloud Provider and Service Model
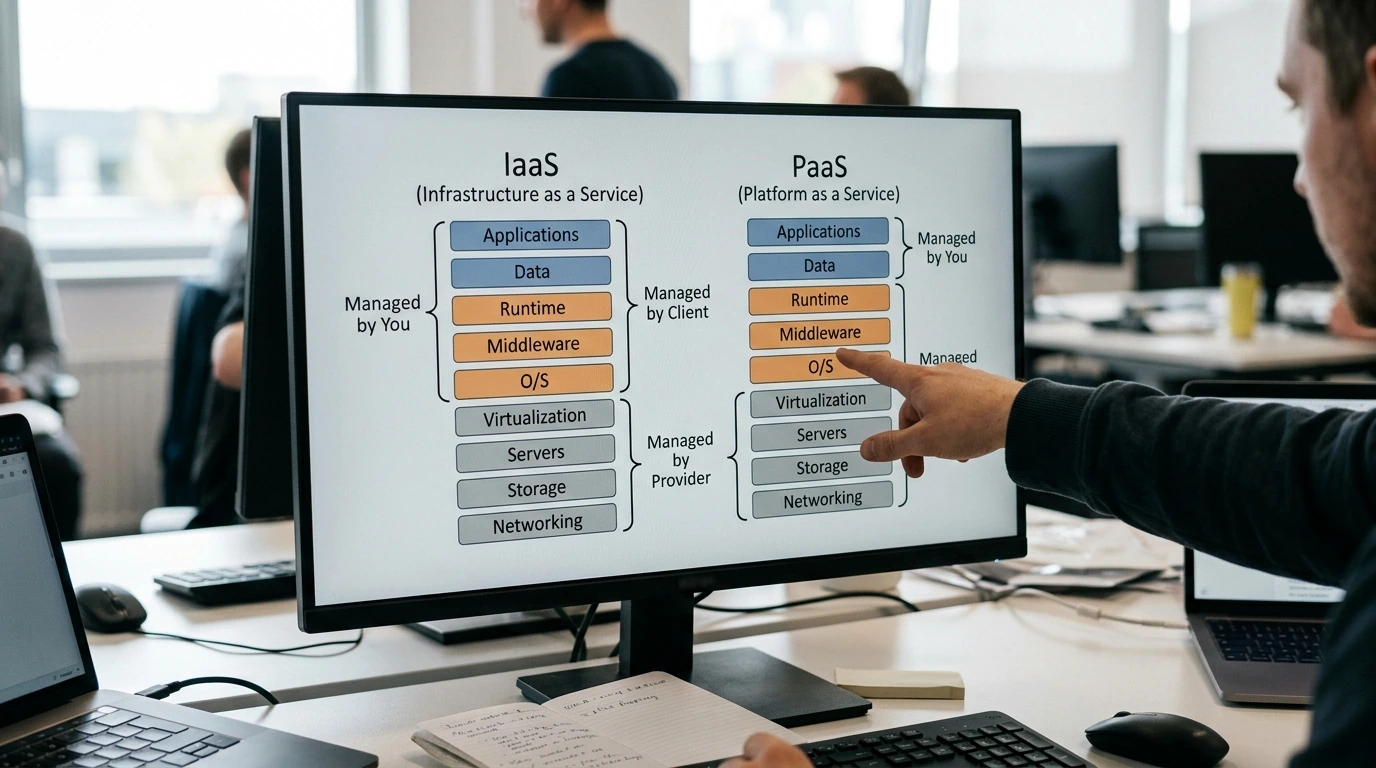
Evaluate providers like Amazon Web Services (AWS), Microsoft Azure, Google Cloud Platform (GCP), DigitalOcean, or Vultr based on your specific needs. For scalable web apps, consider Infrastructure as a Service (IaaS) for maximum control (e.g., EC2 on AWS, Virtual Machines on Azure) or Platform as a Service (PaaS) for managed environments (e.g., AWS Elastic Beanstalk, Azure App Service, Google App Engine). PaaS solutions abstract away much of the server management, allowing developers to focus purely on code.
Step 2: Account Creation & Initial Setup
- Register: Navigate to your chosen cloud provider's website and sign up for an account. Utilize any available free tier offerings to experiment without immediate cost.
- Secure Account: Immediately enable Multi-Factor Authentication (MFA) for your root or primary account. Create a dedicated Identity and Access Management (IAM) user with administrative privileges for daily operations, following the principle of least privilege.
- Configure Billing: Set up billing alerts to monitor expenditure, especially if using a free tier or experimenting with new services.
Step 3: Choosing a Region & Service Model
Select a geographical region closest to your primary user base to minimize network latency. For example, if your users are predominantly in Southeast Asia, choose a region like Singapore or Jakarta. Within this region, decide on your specific compute and database services.
- Compute: Provision Virtual Machines (VMs) or container instances (e.g., Docker containers on Kubernetes/ECS/AKS) that match your application's resource requirements (CPU, RAM). Start with a modest instance type and scale up or out as needed.
- Database: Choose a managed database service (e.g., AWS RDS, Azure SQL Database, Google Cloud SQL). This offloads database administration, backups, and scaling. Select the appropriate database engine (MySQL, PostgreSQL, MongoDB, etc.).

Step 4: Resource Provisioning & Configuration
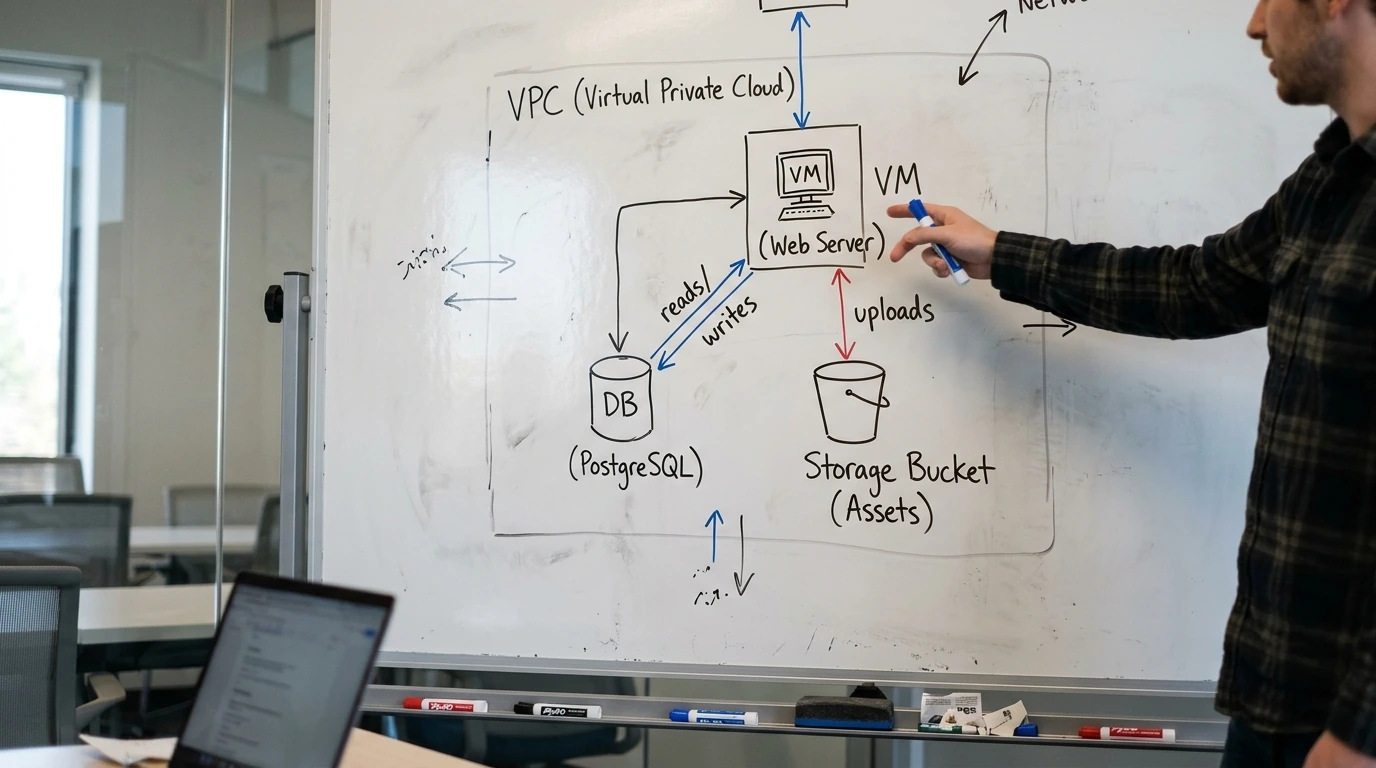
- VM/Container Setup: Launch your selected compute instances. Configure operating systems, install necessary runtimes (Node.js, Python, PHP, Java), and ensure all security patches are applied. For containers, push your Docker images to a container registry.
- Database Setup: Create your database instance. Configure security groups to allow access only from your compute instances. Create initial databases and users.
- Storage: Implement object storage (e.g., AWS S3, Azure Blob Storage, Google Cloud Storage) for static assets, user-uploaded content, and backups. This is highly durable and cost-effective.
Step 5: Network Configuration (VPC, Security Groups, Load Balancers)
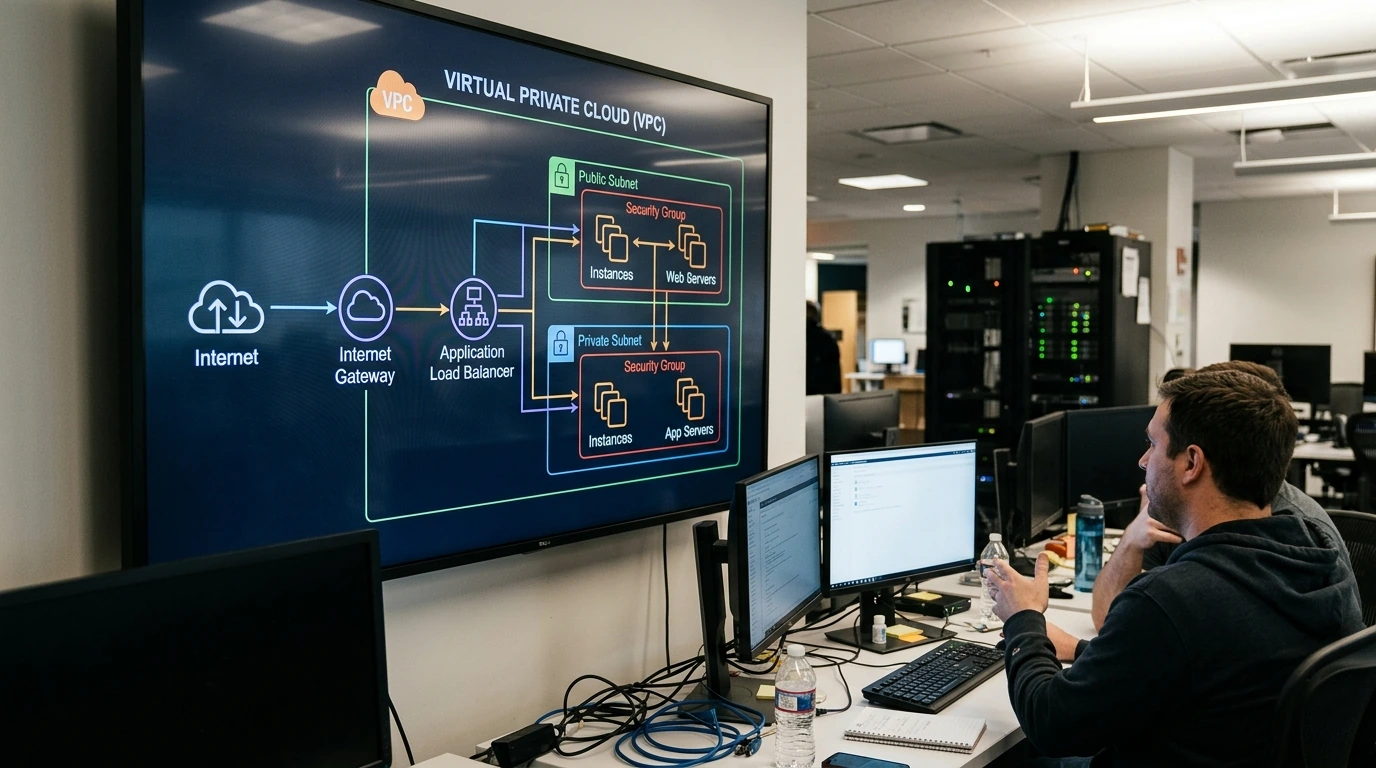
- Virtual Private Cloud (VPC): Set up a VPC to isolate your cloud resources. Define subnets for different tiers (e.g., public subnet for web servers, private subnet for databases).
- Security Groups/Network Security Groups (NSGs): Create firewall rules to control inbound and outbound traffic. Allow HTTP/HTTPS (ports 80, 443) to your web servers. Restrict database access to only your application servers.
- Load Balancer: Deploy a load balancer (e.g., AWS ELB, Azure Load Balancer, Google Cloud Load Balancing) to distribute incoming traffic across multiple compute instances. This is crucial for high availability and horizontal scaling. Configure SSL/TLS certificates on the load balancer for secure communication.
- DNS Configuration: Update your domain's DNS records (A record, CNAME) to point to your load balancer's public IP or hostname.
Step 6: Deploying Your Application
- Manual Deployment: For initial testing, you might use SCP (Secure Copy Protocol) or Git to transfer your application files to your compute instances.
- Automated Deployment (Recommended): Integrate with a Continuous Integration/Continuous Deployment (CI/CD) pipeline (e.g., Jenkins, GitLab CI, GitHub Actions, AWS CodePipeline). This automates code builds, tests, and deployments, ensuring consistent and rapid updates.
- Environment Variables: Configure sensitive information (database credentials, API keys) using environment variables or a secrets management service (e.g., AWS Secrets Manager, Azure Key Vault). Never hardcode these into your application.

Step 7: Monitoring & Auto-Scaling Configuration
- Monitoring: Enable cloud provider monitoring services (e.g., AWS CloudWatch, Azure Monitor, Google Cloud Monitoring). Track key metrics like CPU utilization, network I/O, disk usage, and application-specific metrics (request latency, error rates).
- Logging: Centralize your application and server logs (e.g., to AWS CloudWatch Logs, Azure Log Analytics). This is crucial for debugging and performance analysis.
- Auto-Scaling: Configure auto-scaling groups for your compute instances. Define policies to automatically add or remove instances based on metrics like CPU utilization (e.g., add an instance if CPU exceeds 70% for 5 minutes, remove if below 30%). This ensures your application can handle fluctuating loads without manual intervention.

Common Pitfalls, Critical Mistakes to Avoid During Execution
- Cost Overruns: Neglecting to monitor billing alerts and leaving unused resources running can lead to significant unexpected costs. Always clean up resources after testing.
- Security Misconfigurations: Overly permissive security groups (e.g., allowing SSH from
0.0.0.0/0) or weak IAM policies are critical vulnerabilities. Implement the principle of least privilege. - Vendor Lock-in (Nuance): While avoiding vendor lock-in completely is challenging, designing your application with cloud-agnostic principles (e.g., using containers, standard databases) can ease migration if necessary.
- Inadequate Monitoring: Without comprehensive monitoring and logging, diagnosing performance issues or outages becomes a complex, time-consuming task. Ensure alerts are configured for critical thresholds.
- Neglecting Backup Strategies: Assuming cloud providers handle all data protection is a mistake. Implement regular, automated backups for your databases and critical data, and test restoration procedures periodically.
- Not Testing Scale: Deploying an auto-scaling group without actual load testing means you won't truly know its effectiveness. Perform stress tests to validate your scaling policies.
PRO CALLOUT NOTE: Implement Infrastructure as Code (IaC)
For any production-grade application, manually provisioning resources is prone to error and difficult to reproduce. Utilize Infrastructure as Code (IaC) tools like Terraform or AWS CloudFormation/Azure Resource Manager/Google Cloud Deployment Manager. This allows you to define your entire cloud infrastructure in code, enabling version control, automated deployments, and consistent environments. It significantly reduces configuration drift and improves operational efficiency, critical for maintaining 99.99% uptime targets.
Post-Implementation Verification Checklist
Once your application is deployed and configured, a rigorous verification process is essential to ensure reliability and performance.
- Uptime & Accessibility Check: Verify that your application is accessible from various global locations using external monitoring tools (e.g., Pingdom, UptimeRobot). Confirm 200 OK responses.
- Load Testing: Conduct load tests (e.g., Apache JMeter, k6, Locust) to simulate expected and peak user traffic. Observe how your auto-scaling policies respond and analyze performance metrics (response times, error rates) under stress. Target a minimum of 10,000 requests per second with average latency below 150ms.
- Security Audit: Perform basic security scans and penetration tests. Verify that only necessary ports are open and that security group rules are correctly applied. Check for misconfigured S3 buckets or open database ports.
- Log Analysis: Review application and server logs for errors, warnings, and unusual activity. Ensure logs are being properly collected and stored.
- Backup Verification: Confirm that automated backups are running as scheduled for your database and critical data. Periodically attempt a test restoration to validate the backup integrity.
- Cost Monitoring: Regularly review your cloud billing dashboard. Set up detailed cost allocation tags to track spending by project or department, ensuring you remain within budget.
- Disaster Recovery Test: Simulate a failure (e.g., stopping an instance) to observe how your load balancer and auto-scaling group react, ensuring seamless failover.
Crafting a Data Science Powerhouse: A Component Selection Guide for Peak Performance →
FAQ Section
- Q: How much does cloud hosting for a scalable web app typically cost?
- A: Costs vary widely based on traffic, resource usage, and provider. A small, scalable app might start from $50-$100/month, while large enterprise applications can run into thousands. Leveraging free tiers and optimizing resource usage is key to cost management.
- Q: Is it possible to migrate an existing web app to the cloud?
- A: Yes, most web applications can be migrated. The complexity depends on the existing architecture. Containerization (Docker) often simplifies migration, making applications more portable across different cloud environments.
- Q: What's the difference between horizontal and vertical scaling?
- A: Horizontal scaling (scaling out) involves adding more instances (e.g., adding more web servers) to distribute load. Vertical scaling (scaling up) involves increasing the resources (CPU, RAM) of an existing instance. For web apps, horizontal scaling is generally preferred for resilience and cost-effectiveness.
- Q: How do I ensure data security in the cloud?
- A: Implement strong IAM policies (least privilege), enable MFA, use encryption for data at rest and in transit, configure strict network security groups, and regularly patch your operating systems and applications. Regular security audits are also crucial.


Post a Comment for "How to Register Reliable Cloud Hosting for Scalable Web Apps"